
So do y’all remember last month when a few friends of mine and I got together and did a clearance challenge? We’ve decided to make it a monthly thing and will choose random bloggers to join us each time.
Here are the rules:
Each of us must spend no more than $15 on the item or items which we buy and they must be on clearance. Then we must use them to style something that is appropriate for the season. The first time we did this I did a fall vignette in my dining room with some items from Hobby Lobby. Last month I bought a wooden shelf from Hobby Lobby that was on clearance because it was broken. I fixed it, styled it and put it in my front entry.
I can’t wait to show you what I found this month! I will share the other bloggers links at the end of this post so you can check out their’s as well.
I will admit, I struggled with the challenge this month.
It’s possible that I waited too long to start looking for my clearance item(s), but that would mean I am a procrastinator and who wants to admit to that? It’s possible that getting Christmas gifts for 5 kids, styling my home for Christmas and doing my usual laundry list of DIY projects got me a little distracted until it was almost too late.
It’s also possible that I just grabbed the photos and am sitting and writing this post with mere hours to spare. I’m not saying that’s what happened…..but it is possible.
I searched the clearance items in a variety of stores including the one that usually never fails me – Hobby Lobby. Nothing was inspiring me this time. It was all either fall items that couldn’t be used in a winter vignette of any sort or not my style at all. I really wasn’t interested in getting something just for the sake of saying I bought something on clearance. I’m all about saving money and that means not buying something that doesn’t work for my home.
Then I saw it!

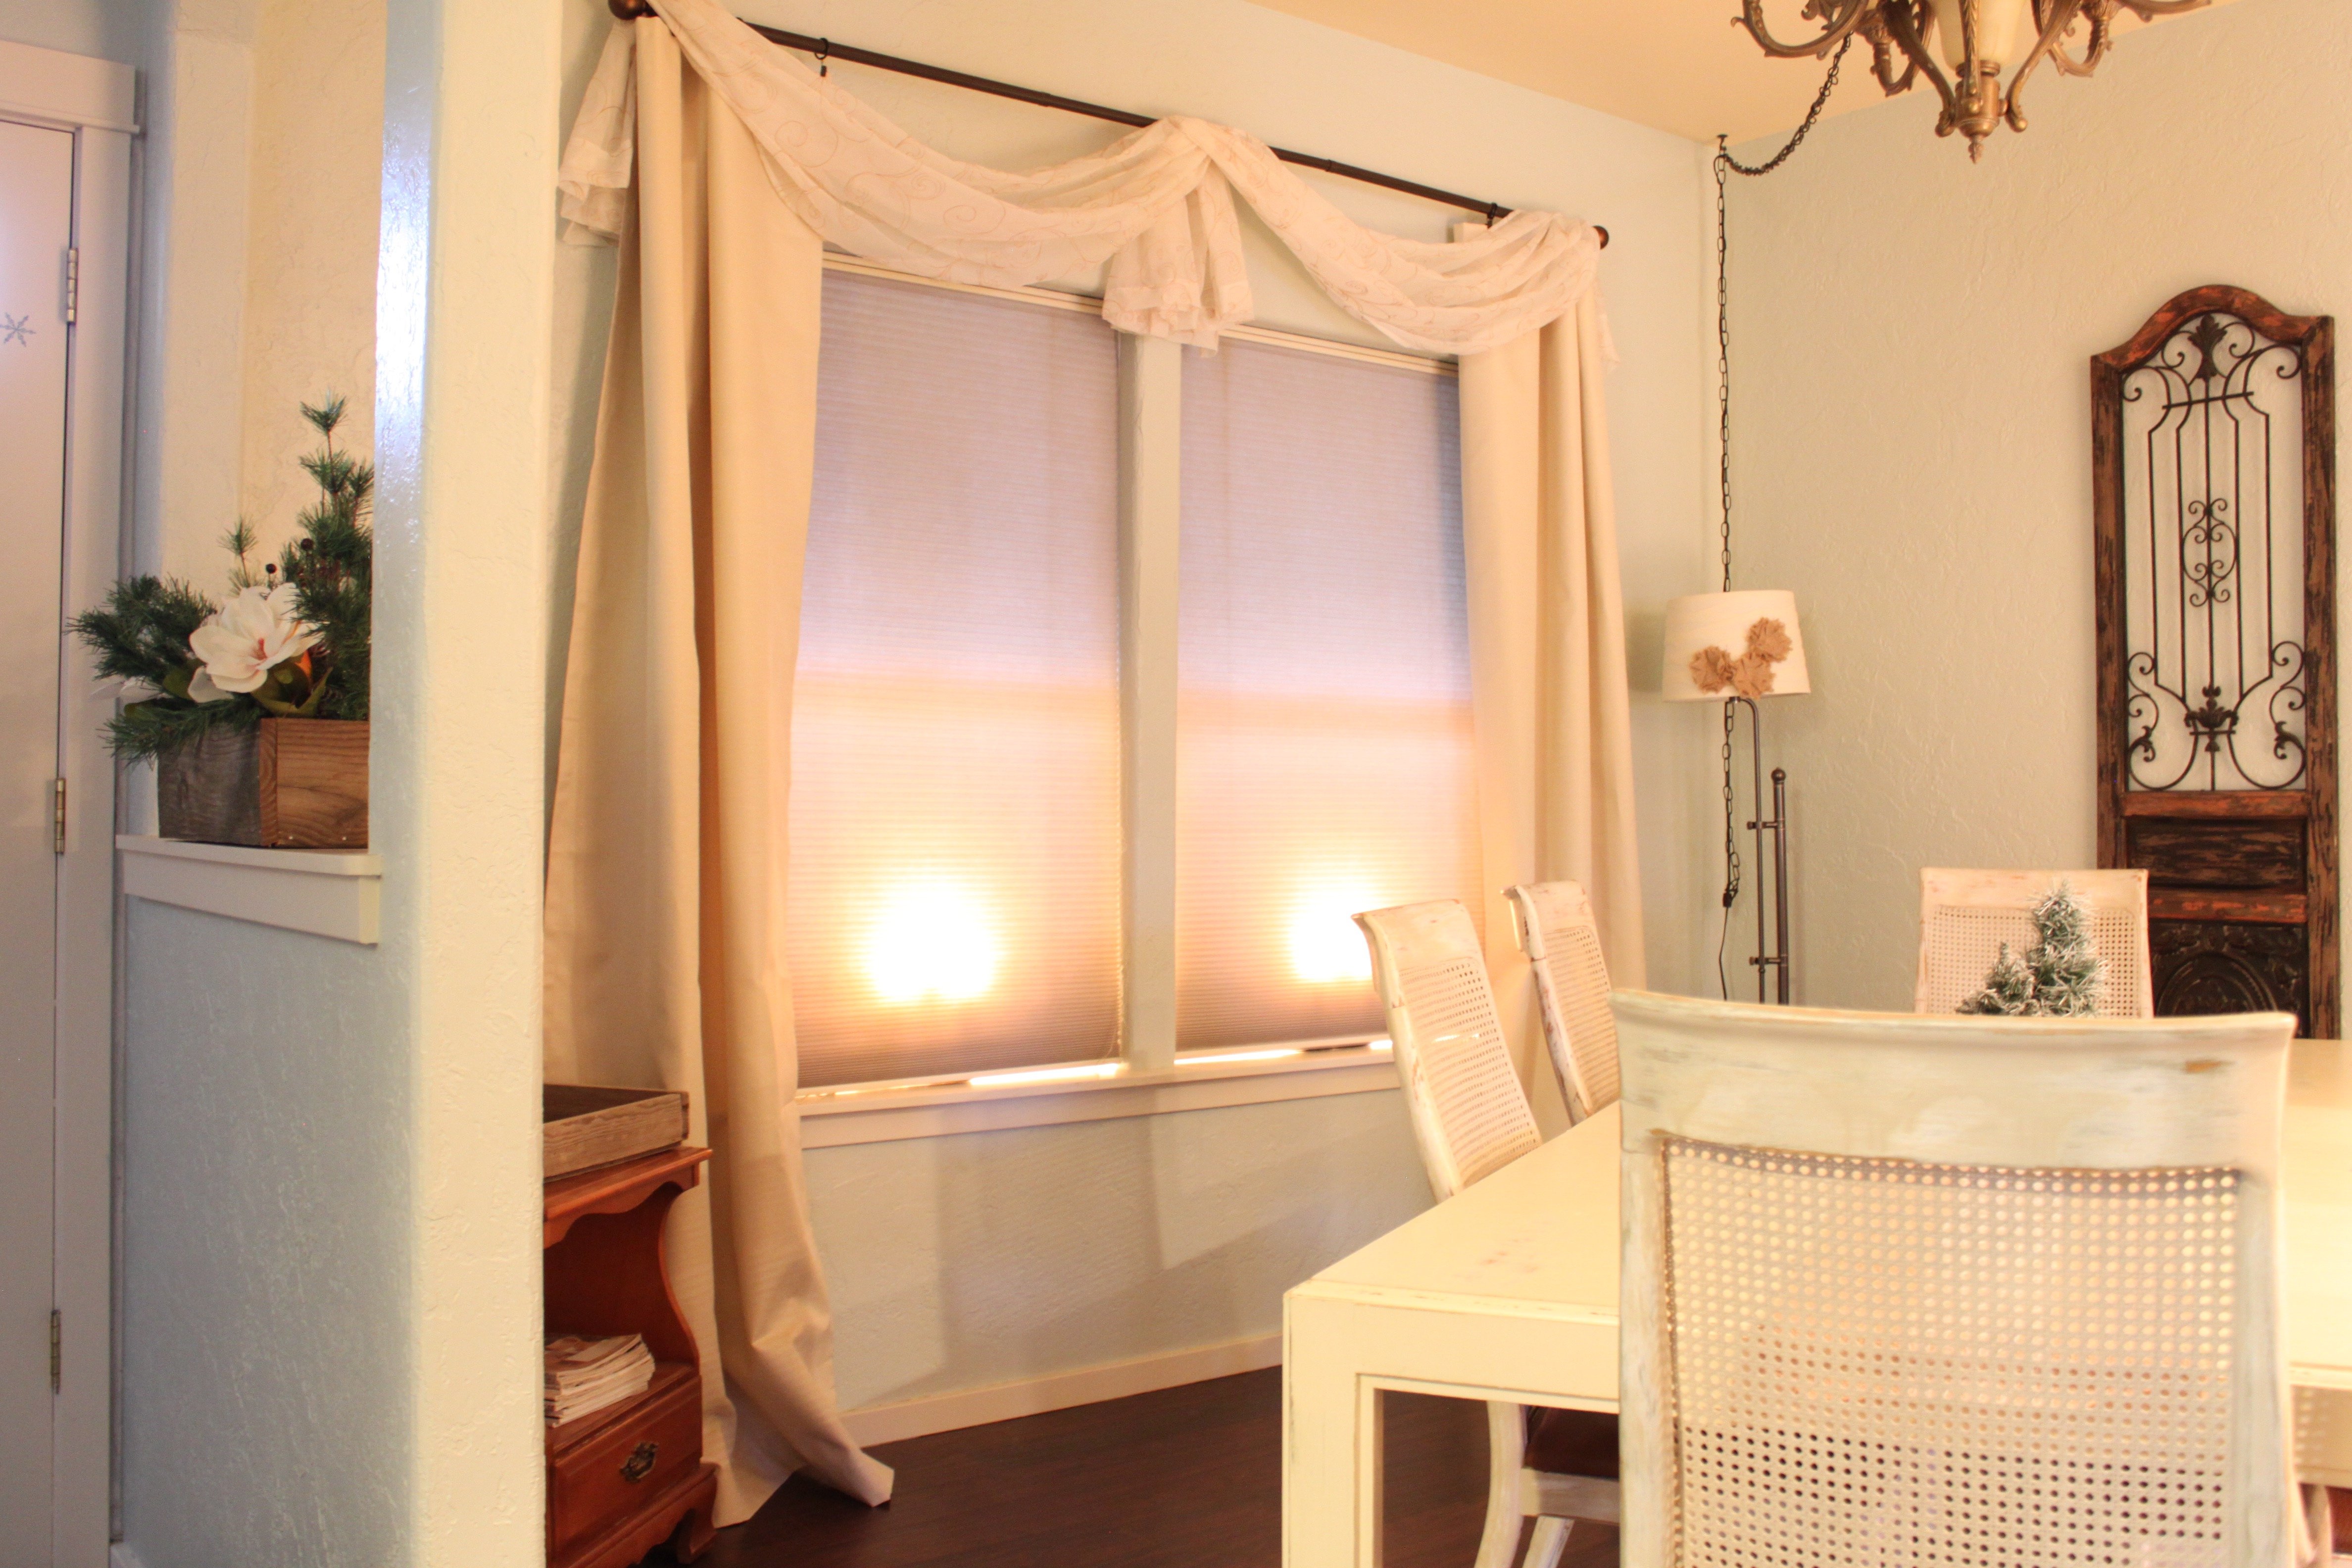
I wasn’t even looking for it. I was cutting through a row to get to another section I thought I might find something in and the brightly colored clearance tag caught my eye! There they were! What, you ask? Two ivory colored curtain panels from the Eclipse line that Walmart carries. Only two. Regularly $16 on clearance for $6.99! I snatched them up.
I’ve been planning on doing something on my dining room window for a long time. It was lacking the coziness and “moved in” feeling that curtains and rugs can bring a room. And I don’t have a rug in the dining room either!
You may want to know what was so exciting about ivory curtain panels. These particular ones are light blocking, insulated panels which I liked. They are a very heavy material, which I liked. I don’t like light coming through my panels. It doesn’t look as formal to me and I had my dining room in mind for these.

I knew the panels would work well in there but I also knew they were pretty plain. I wanted to dress them up a bit and give them some added interest. Initially I thought of adding some trim along the edge or a few rows of trim along the bottom but nothing that I found was really what I was envisioning. I even searched my personal stash of fabric and trim and had nothing but that’s when the idea came to me.

I had these sheers! A slightly aged white with gold threads. Wanna see what happened when I layered these?

Voila! I used a curtain rod I had sitting around and hung them higher than the window to make the most of the tall ceilings but allowing the panels to puddle just a little. They had a rod pocket but I prefer the look of drapes hanging more freely from rings so I bought some of the rings that clip to the top of the curtain panels.

Then I simply draped the sheers across the corners of the curtain rod and crossed them in the middle.
No sewing.
No power tools (unless you count the cordless drill I used to install the curtain rod brackets. Considering the battery was almost dead at the time I don’t think it qualifies as “power” anything!)
So the panels themselves for this challenge cost me a total of $14 before tax which is within my $15 budget. I used some sheers and a curtain rod I already had and purchased a few rings to hang the curtains with for approximately $10.

It’s a bit tricky to take pictures of my window in my dining room because the only way to get across from it is to stand in my kitchen and shoot through the narrow arched opening in to the dining room. I can’t ever get the angle I’d like unless I want to move some walls which is a project for another day! lol
I hope this has given you some ideas for window treatments in your own home. They don’t necessarily have to cost a lot to make a big impact in the room.
Now I know you are anxious to check out my friends who did this challenge as well and see what they came up with. I won’t make you wait any longer. Drumroll please!
Susan from Color Joy Interiors

Terrie from Decorate and More With Tip

What a great find! Those panels go perfectly in the room!. Its just goes to show you do not need a lot of money to decorate!
Exactly! You just have to be in the right place at the right time to find the bargains and then pretty much always have to think outside the box and get creative.
What a dramatic and beautiful window treatment! Love how you embellished the curtains using what you have. Great holiday dining room! Merry Christmas!
Thanks so much, Susan. I had bought a bunch of these curtain rods when I found them on clearance a good year or more ago. $4.99 if you can believe it. I’ve been using them all around my home, one by one and they’ve saved me SO much money!
Tara I am so amazed at how you styled your window. The treatment looks like you spend lots of money. You have shared a great way to style a window for nearly nothing but a few minutes of our time. I would love a tutorial on how you made the swag. Have a great Monday!
Thanks so much, Terrie. I literally just took a sheer panel, the full length and gathered it about a foot in from the end and tucked it behind the curtain rod finial. Then I gathered the other end about a foot in from the end and tucked in on the OPPOSITE side of the middle support bracket for the curtain rod. Then I did the same thing on the other side crossing it in front of the other one in the middle. A few adjustments to make them drape evenly and that’s it!
Tara, WOW!! Such a great find!! I love how you have layered the curtains! These curtains have really dressed up your dining room, makes the room look so cozy! Love the curtains!!!
~Emily
Thanks, Emily! It’s amazing what a difference a bit of fabric at a window can make.
Tera,, this is Absolutely beautiful hon!
You always amaze me! What a find and what a wonderful idea! Charlene ,, CharDebs
Thank you so much, my sweet friend.