
I don’t really have many walls to decorate. That’s the bad part about an open concept home. Well, one of the bad parts. As you can tell, I’m not a fan.
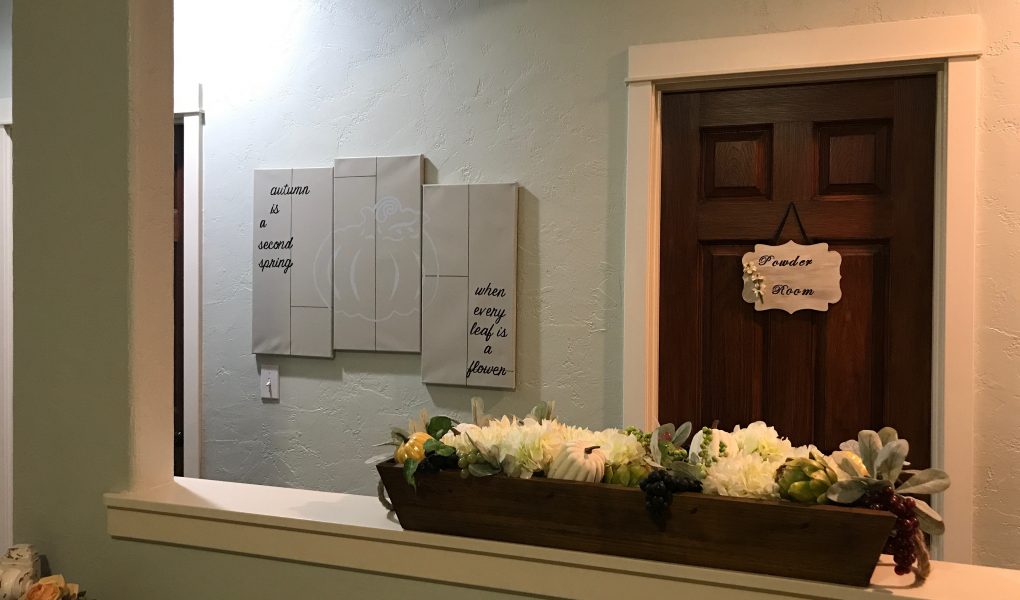
However, the walls that I do have need to have something on them but it isn’t always easy to find just the right thing. I have this one wall in my hallway downstairs, just outside my powder room, that has never had anything hanging on it. Sort of a shame considering it’s one of the few places I could actually hang something.
When we were planning our 5 One Friday: Five Fun Fall DIY’s blog post, I got to thinking that it would be nice to make something for a wall rather than all just DIY’s that were for tabletops and mantels etc.
But what?
I had a plan!

I had 3 of these canvases laying around from my oldest daughter’s room that weren’t being used anymore. I hadn’t wanted to just give them away but I had no other use for them so they were sitting in a box in my garage.

I painted them with 2 coats of Sherwin Williams “Mindful Gray”, left over from my Master Bedroom.

Next I marked the exact middle with a piece of Frog Tape.

I taped off a very narrow strip along that middle line with my Frog Tape.

Then I painted it with Waverly chalk paint in the color Elephant.

Next I lined up my canvases as I was going to hang them on my wall, offset from each other a little.

I taped off some randomly placed horizontal stripes on each canvas.

Peel back the piece of tape that will be underneath your horizontal line but leave the one on the outside of the vertical line to prevent you from painting past the line.

Once the horizontal lines were painted and all the Frog Tape was removed, I took a pumpkin shaped placemat that I picked up at Dollar Tree (they had acorns and leaves as well) for a stencil, and placed it in the middle of my canvases. I lightly taped it down in several places to make sure it wouldn’t move and traced the outlines with a chalk pen.

…and then a pink marker when my chalk pen went dry!

Using an artists paintbrush I painted my pumpkin. I used a light aqua-blue paint.

Next I printed a quote in a font I like and cut around some of the words to make it easier to see where I wanted to position it.

I turned the paper over and used my pencil to color in the back of the words.

Once you turn the paper over, right side up, place it in the position you want it and trace over the words with your pencil, a faint outline will appear on your canvas.
Next use either a paintbrush and craft paint or a Sharpie and fill in your lettering.

It’s actually kind of addictive. I think I’m going to be making signs and lettering everything now! 😀


Hope has given this DIY her seal of approval.

Until next time…
You can follow me on Pinterest and Instagram for even more ideas and great product deals. Follow my blog with Bloglovin

This turned out great Tara. I like how the pumpkin is subtle. You have been very busy.
Cindy
Thanks so much, Cindy. That was my plan. I didn’t want the pumpkin as the main focus. I’m glad you like it.
This is so cute!! You are so talented, my friend!!!
~emily
Lol thanks! I was originally planning to make a wood sign but then while digging around in my garage I tripped across these old canvases sitting there unused and felt guilty ?
That is so pretty! I love how you transformed the canvases into a piece of art that is uniquely you!
Happy day friend!
karianne
Thanks so much! It’s fun to try and make something new from something you aren’t using anymore, isn’t it?
[…] HERE for all the […]