
I wasn’t going to share these with you initially because they aren’t completely finished. I am a bit of a perfectionist and I hate showing things that I haven’t finished or that I don’t like. Then I decided that the part that I am planning to show you in terms of a tutorial, is completed so it would be silly to avoid this project all because I don’t have the hardware for these yet. Well, I do but I don’t. Let me explain….
I was looking for some nightstands for my master bedroom for either side of our bed for quite some time. I didn’t care what the color or finish of them was because…..well when has that ever stopped me? 🙂 Exactly! However I do like quality pieces of furniture that are good and solid. I also needed a specific size because I only have so much space left on either side of the king sized bed. I didn’t have to have matching ones, in fact I quite prefer the look of mis-matched furniture in spaces like this so long as they have the same overall style and weight. So with that much open to chance you’d have thought I would find something right away, right? Wrong! Anything that I liked brand new was several hundred per piece and that wasn’t in my non-existent budget. I had to go used, as usual. I was fine with this but it takes quite a while sometimes.
After months of searching I found something at my favorite consignment store!
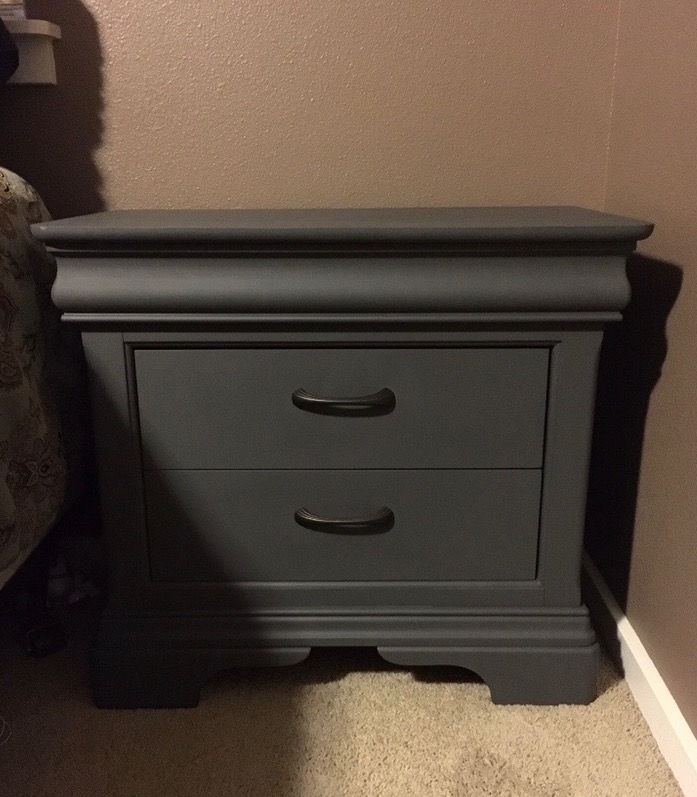
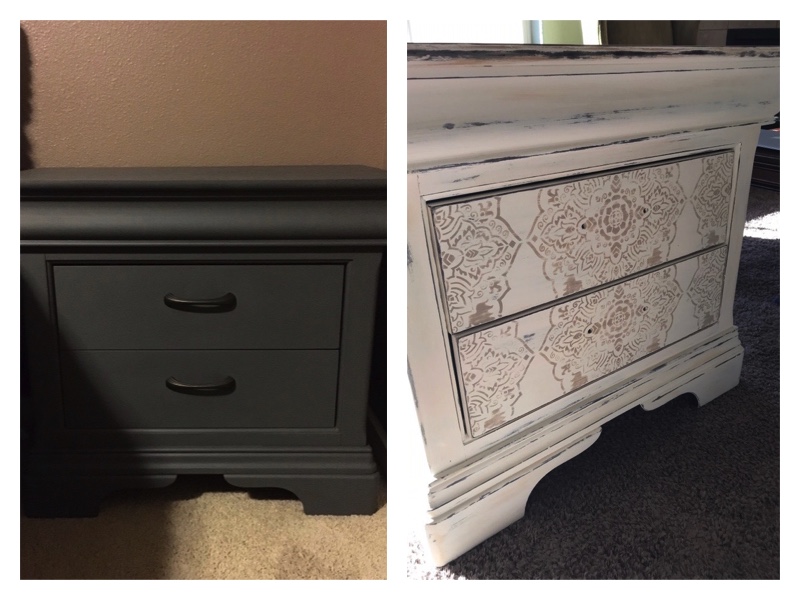
Sorry for the beautiful shadow across this! In the evening when I took this photo there is terrible lighting and at the time I had no intention of sharing it so I didn’t care. It was only for my own amusement to look back on. Anyways, that said, this is what they looked like. Blah….someone had chalk painted them in a dark gray and there didn’t appear to be any wax or poly on top as it was a very matte and dusty surface. The chalk paint was very smooth and well done though in terms of application and I had a gut feeling that I could potentially find some lovely wood tops on these under that chalk paint! My original plan was to take the paint off the tops and see if I could do a nice stained wood top, then paint the body in a distressed creamy color. I could see it in my mind’s eye.
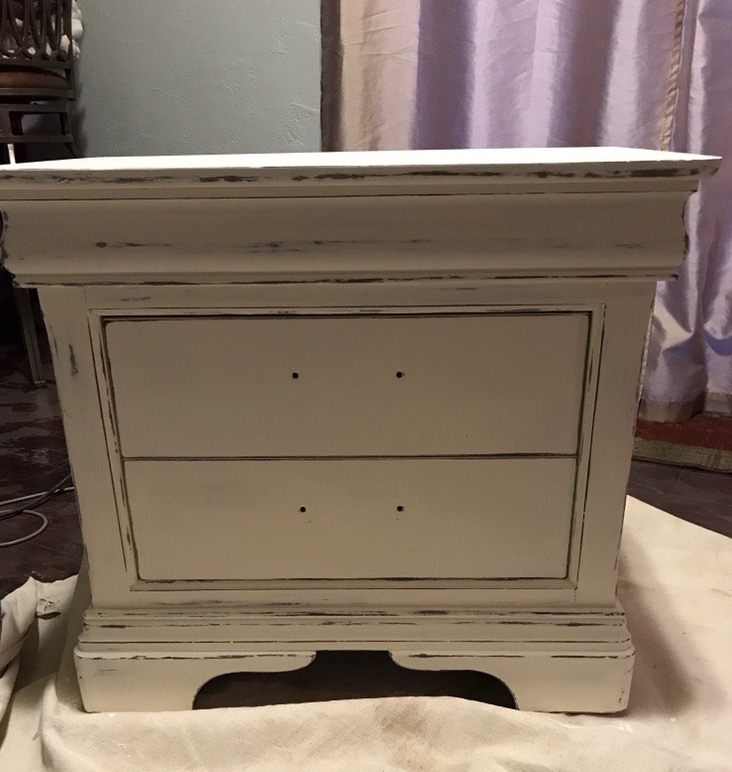
Alas, the best laid plans of mice and men (women)….when I exposed the wood tops I was so excited! Just what I had hoped for. And then it wasn’t. The top of the first one I stripped the paint off of had damage to it that had been patched, albeit well, since I hadn’t even noticed it when it was painted. This meant however that I couldn’t stain the tops or there would be these big voids in the wood grain where the tops had been patched. Oh well! Plan B. That’s the down side to doing projects like this where you don’t know what exactly you will find underneath.
As you can see, I chalk painted them in a creamy color, very similar to Rustoleum chalk paint in Linen White. It was just a little darker cream. After 2 coats, I sanded them back on areas that would normally be worn the most during normal use. It’s actually the dark gray that you are seeing in a lot of the distressed areas but in some places I did sand all the way back to the dark wood underneath. After cleaning off all the dust, I did like them but they were just a little too boring for what I had in mind. Oh well!
I dry brushed on some Waverly Chalk Paint in Cashew and Ivory just lightly here and there. Just to give it more depth and interest. I fully intended to put nice new hardware on it but that still wouldn’t be all that I wanted. I considered putting some wood decorative trim on them and almost went with that but I’m not the most patient of people and I didn’t have the wood trim on hand. What I did have though was a stencil and some paint!!!! Aha!
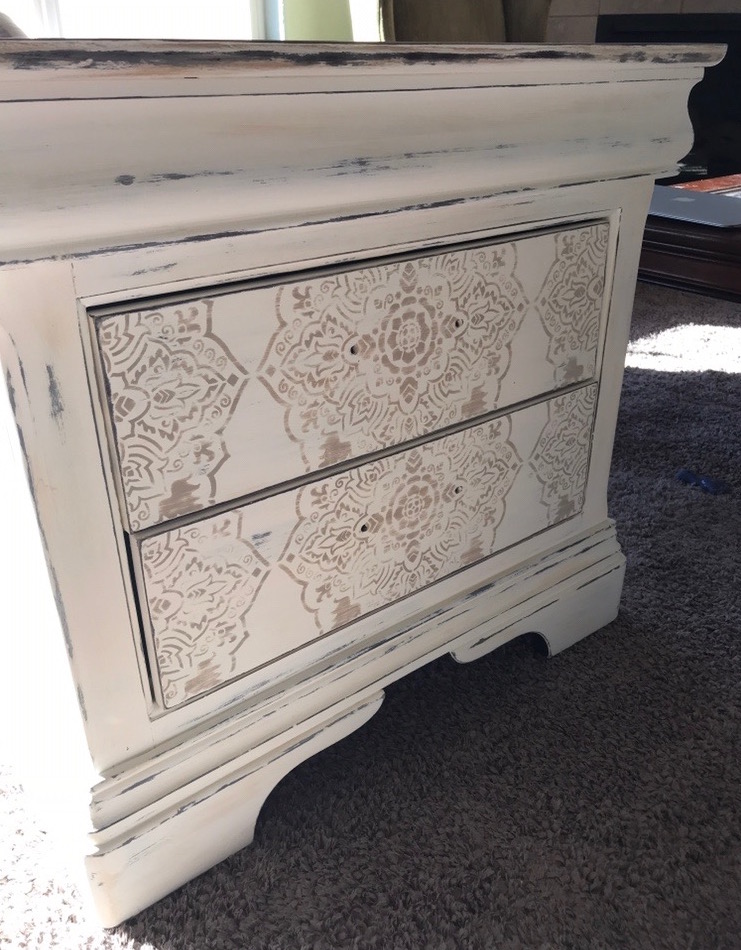
I took out the drawers and taped the stencil on with my favorite Frog Tape. Using mostly Waverly chalk paint in Mineral with just a touch of Truffle mixed in, I stenciled them with a 4″ foam roller.
After letting it dry very well, I ever so lightly sanded over the stencil to make it look old and faded. I also distressed a little deeper in places showing just a little of the dark color underneath. Now for the tops!
I started off doing the tops just as I had been doing the entire pieces all through this process but I couldn’t get the thought out of my head that I wanted the tops to be darker. Why not try to do just that with paint?
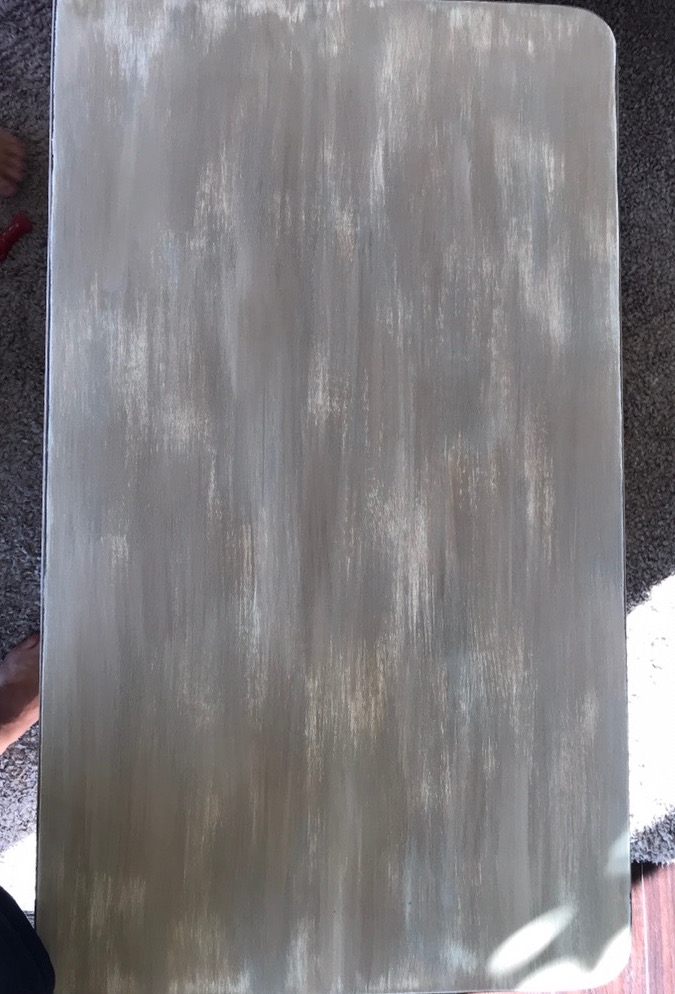
This is what I ended up doing. Keep in mind it was the creamy white underneath just like the body of this piece. I put small dabs of several colors of chalk paint (Both Mineral, Truffle and a gray that I believe is called Elephant?) on a paper plate very near to each other. Then I touched my brush bristles into each color and lightly dabbed it a couple times on a bare spot of the plate to blend them just slightly. I did NOT take any of the excess off of the brush but when I applied it I did it very lightly back and forth like you would for dry brushing. I kept doing this same technique over and over until I got the look I wanted. I left some of the cream showing through as you can see. Once it had dried well, I did take a very fine piece of sandpaper and very lightly sanded the top just to make it all smooth in appearance and feel but not to distress it at all other than on the very edges.
I finished it all off with 2 coats of Minwax Polyurethane in a Satin finish. As always my favorite brushes for basically everything except brushing my hair, are the Zibra brand. They come in so many different styles and sizes. You really need to try them!
Well? What do you think of the finished product? Did I forget anything? Oh! Hardware! Okay there is a reason that I don’t have exactly a styled finished result for you. So….as happens way too often when you refinish a piece of furniture, the hardware already on this piece was not what I wanted so I chose to replace it. Easy, right? Nope. The holes for those particular handles were of course at a different distance apart than ANYTHING I could find that I liked! I even looked for hardware I liked in ANY color because I can always change the color of something. Nothing. I was getting pretty discouraged until I found a solution!
The problem is, everything has to be extremely inexpensive before I will go ahead and buy it. I rarely buy anything at full price. I simply can’t afford to with the size of our family. So I had found something that would work perfectly on these nightstands but they cost more than I wanted to pay by the time I would get 4 of them. So what did I do? Well I decided to wait. Until they go on sale. The minute they do, I will be buying them and I will put it all together, style it properly and update this post with a new picture of them. I promise! You’ll just have to check back again soon to see it!
I’d love to have you join me on Pinterest and Instagram!
This site contains affiliate links to products. I may receive compensation for purchases made through these links.


It turned out so pretty Tara! I love the color and the stenciling!!!
Thanks, Jerri! I can’t wait to show you how they look all styled!
It looks great Tara! I love the stencil! Great job!
Laura
Thanks so much, Laura!
Those are so pretty Tara! Have you thought about using wood filler in the holes and drilling new ones for more handle options?
Yes I absolutely have but I would have needed to do that before I did the stenciling and I mistakenly thought new hardware would be easy to find that would fit! I had to fill and re-drill holes for hardware on my tall dresser….
Wow, you really had a time with this piece but glad it worked out and I love the stencil idea. Can’t eat to see it styled. I know what you mean about wanting to buy it. I’m the same!
A girls gotta do what a girls gotta do, you know?
Love your nightstands!! The stencil adds such a lovely touch!!
~Emily
Thanks! I thought it needed something more, you know?
[…] The ones I already showed you a makeover on once […]