It’s not that I don’t want to work on these projects. I love making things and I love blogging.
As usual, however, here I sit, one eye on the clock and one eye on my screen while I quickly load my photos from my camera to my laptop and write this!
Side note: It is imperative that your scissors match your fabric in order for this project to work! (joking)
I originally purchased this coffee mug for The MR because it’s totally him. If I was being honest though, its pretty much me as well.
Like this morning when I should have been all done my challenge piece and I hadn’t even started it yet!
Well best get started!
Y’all know how these challenges work by now, right?
Myself and my fellow bloggers will take an item(s) that we purchased on clearance and make whatever changes we need to in order to incorporate it into our homes. We will show you what we did to it and/or how we styled it. I will provide the links to all the other bloggers posts at the bottom of the page.
Several weeks ago while I was doing some shopping at Walmart, I happened to spy several fabric remnants that were in a clearance bin. It just so happened that they were lovely pieces of Waverly prints that were the perfect colors for some decorative items for my home.
I happily snapped them up!
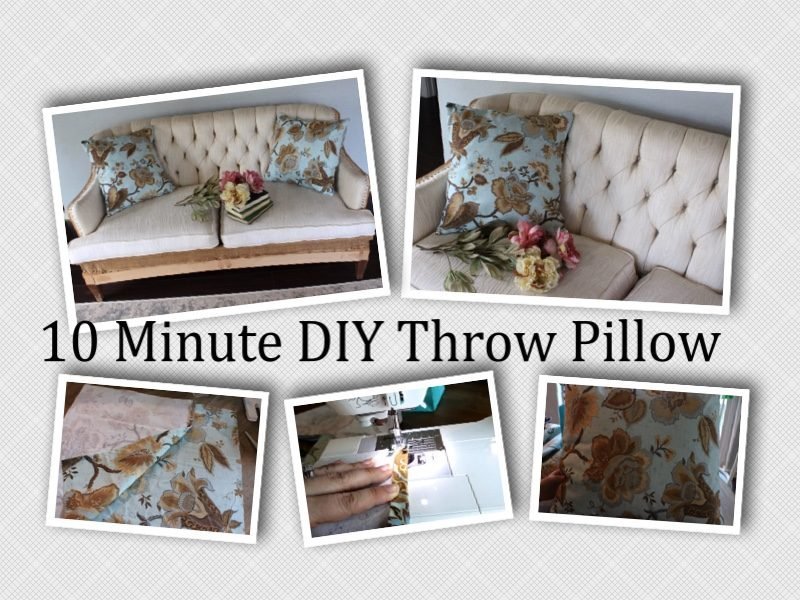
One of them was earmarked for some throw pillows.
What do driving a car and sewing have in common?
Now I know what you’re going to say.
“I can’t sew”.
My response to you is – can you drive a car?
If so, then you can sew.
It’s harder to thread the machine than it is to make a throw pillow. I have a few tricks that make it insanely easy and I’m gonna share them with you in this post.
Start by measuring your pillow form that you intend to make the cover for.
Tip #1: I buy pillows at thrift stores for $1-3 dollars, wash them and use them for my pillow inserts. Buying brand new pillow forms will run you $10 and up generally. Keep an eye out for light and neutral covered pillows as they are less likely to show through the fabric cover you put on them.
Now in some cases you can remove the cover that is on the pillow you just bought at a thrift store (like the one above) but if it’s filled with polyfil (loose stuffing) then just leave the cover on.
Both my pillow inserts are 18″.
Add 1 inch (for the seams) and cut your fabric for the front of the pillow.
I’m just marking my 19″ with a regular pen so you can see you don’t have to have all sorts of fancy sewing gadgets for this project.
I cut two 19″ squares for the fronts of my 2 pillows.
Tip #2: Pillow covers are much easier to store a whole bunch of than entire throw pillows. I make all my covers easily removable and then just switch out the covers whenever the mood strikes or the season changes. It is also very convenient for washing.
Now you are starting to panic because you are convinced there is no way you can put in a zipper.
Then don’t!
Cut 2 pieces for each pillow the same size (19″) from top to bottom but shorter from side to side. I usually cut them 4-6″ smaller.
In other words these 2 pieces ended up measuring 19″ x 15″ and don’t forget you need 2 of those per pillow.
Fold under one of the 19″ edges and press. I usually fold it under 1/2″.
Fold the same edge under again, also 1/2″ and press. This forms a completely finished edge once we stitch it in place.
Do this to one 19″ edge of each backing piece. (remember you cut 2 of these for each pillow that you want to make.)
Stitch along the hem you just created.
I’m not going to show you how to thread the machine and all. Each machine is different. Either you know how to do this step already and the basics of a sewing machine or you can get someone to show you who knows how.
As I said before though, if you can drive a car, you can sew a straight line. It’s the same as steering.
Just line up the right edge of your fabric along the desired stitch line on the metal plate and go slowly keeping it straight. You don’t want to drive into the ditch, after all.
It’s going to look like this when you’re finished. Do this to each piece (2 per pillow).
Now take your 19″ square and place it right side up in front of you.
Place one of the hemmed pieces wrong side up on top of it. Clearly the one side will line up but the other will be quite a few inches narrower than your pillow front. Place some pins in to hold this in place.
Take the other hemmed piece and place it along the opposite edge so that the hemmed edges overlap in the middle.
Here is what it should look like when it is all pinned and ready to sew.
Stitch all the way around the outside edge 1/2″ away from the raw edge. Remember we added 1″ more than the size of the pillow insert? This is why…
Tip #3: Sew a slightly rounded corner as opposed to a perfectly squared off one. This looks better when its on the pillow because no pillow forms have perfectly stuffed sharp corners!
Cut off the excess fabric at the corner in a diagonal. Be sure to leave about 1/4″ between the stitching line and where you cut. This makes for a better corner when you turn the pillow cover right side out as there isn’t all that bunched fabric.
Turn the pillow cover right side out. It should look like this in the back.
See how we made it to easily go on and off without having to sew in a zipper? (After years of sewing in zippers I still don’t like the task)
Now stuff in your pillow form through this open back!
The front will look like this…
And the back will look like this…
Now let’s get to styling!
I can literally make a plain throw pillow like these, from start to finish, in about 10 minutes.
What was that? You love how they look on my “new” deconstructed sofa?
Me too!
I’m still working on the sofa…..it will be another blog post really soon!
Yes, I do have random flowers laying on my sofa on a regular basis. Thanks for asking.
Of course I have to grab a few vintage books because….books!
Loving how the pillows look with the sofa and my wall color.
These are just simple, plain throw pillows. If you wanted to add trim or details to the front or basically anything, the concept remains the same and I do the backs the same way every time.
Since I am reusing pillow inserts I already had, this project cost me less than $5 and I have a fair amount of fabric left from my remnant.
Ready to see what the others found on clearance? Lets go!
Terrie over at Decorate & More with TipEmily over at LeCulitivateurTara over at Stilettos And ShiplapShae over at Sweet Southern GraceDori over at This Full Life 5Jodi over at The House House BlogLindsay over at The Farmhouse Eclectic
Tara, I love how the pillows turned out!! You make it look so easy, but I’m sure if I made pillows they would not turn out as perfect yours. I should pull out my sewing machine and give it a try. And your sofa is amazing!!!
~Emily
I dare you to pull out your sewing machine and follow my tutorial and make some! You can TOTALLY do it! As I said – if you can drive a car safely, you can sew a pillow. I swear.
Tara, I love the tutorial on the pillows! I hate adding zippers so this is such a better alternative. Thank you for sharing. I am pinning this so I can make me a few for my home. Love the pattern and color of your material. I love working on the challenges with you. Hope you have a great week Tara!
[…] I’m walking through a thrift store looking for some pillows to use as forms for the throw pillows I recently made. Of course when you go to a thrift store its an unspoken rule that you must check every aisle, not […]
[…] I made these pillows the way I normally make all my throw pillows (unless I don’t have enough fabric to do the envelope back) for easy removal to clean or use the pillow form for another cover. I’ve got a pillow tutorial HERE. […]


Terrie, you did a fantastic job on the pillows!! I love the fabric! Absolutely beautiful ❤️
I love it too! It’s one of those fabrics I feel like you just wouldn’t tire of and at that price who could resist?
Tara, these pillow covers are gorgeous and look amazing on your deconstructed couch! This was a great tutorial, too!
Thanks so much, Dori. I’m glad you enjoyed it
Wow! Love these and LOVE that fabric. Great job girl!
Thanks Jodi! I’m really loving this fabric as well.
Tara, I love how the pillows turned out!! You make it look so easy, but I’m sure if I made pillows they would not turn out as perfect yours. I should pull out my sewing machine and give it a try. And your sofa is amazing!!!
~Emily
I dare you to pull out your sewing machine and follow my tutorial and make some! You can TOTALLY do it! As I said – if you can drive a car safely, you can sew a pillow. I swear.
Tara, I love the tutorial on the pillows! I hate adding zippers so this is such a better alternative. Thank you for sharing. I am pinning this so I can make me a few for my home. Love the pattern and color of your material. I love working on the challenges with you. Hope you have a great week Tara!
Me too! That’s why I do my pillows this way. Saves SO much time and hassle. It was a super fun challenge this time, wasn’t it?
Tara! What a great tutorial on these pillow covers! You made it so simple to follow! Love the fabric too friend!
Thanks so much, Jerri. It really is simple to make a basic throw pillow like those….
[…] I’m walking through a thrift store looking for some pillows to use as forms for the throw pillows I recently made. Of course when you go to a thrift store its an unspoken rule that you must check every aisle, not […]
[…] I made these pillows the way I normally make all my throw pillows (unless I don’t have enough fabric to do the envelope back) for easy removal to clean or use the pillow form for another cover. I’ve got a pillow tutorial HERE. […]