

I bet you thought I’d forgotten about my 5 Most Nagging Unfinished Projects, didn’t you?
I bet you thought that Project #1 and Project #2 were all that Emily (Le Cultivateur) and I were going to complete before going on to bigger and better things!
Would it surprise you to know you couldn’t be more wrong?
Today I’m going to share one of the biggest projects from that list and sometimes I still can’t believe it’s done.
Okay to be perfectly honest, nothing is ever truly done in my home. I mean I am always tweaking something here and adding something there and taking something away here and by then its time to change everything over there……let’s just say the bones are done. The fluff and stuff is ever-changing.
Wanna see Project #3?

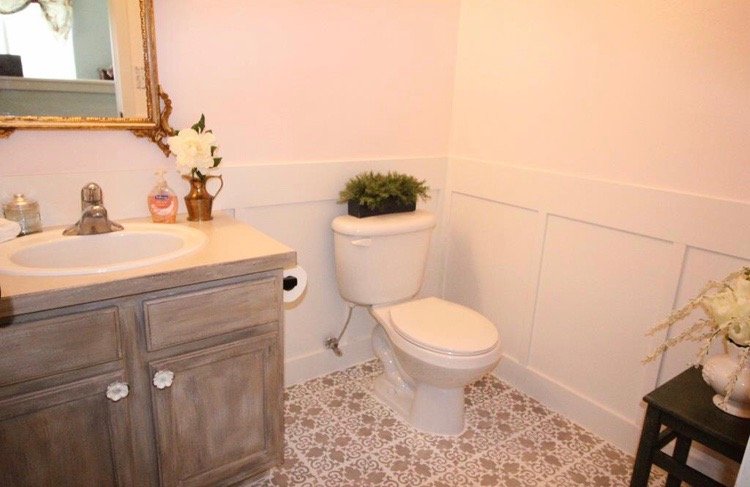
Behold the Elevator Shaft! I left the mirror smudges just for your enjoyment. You’re welcome.
You are likely thinking that I took a terrible picture of this space and that if only I could learn to take better pics it wouldn’t be so bad but what if I told you this picture was actually one of the better ones?
Not only is the Powder Room tiny with a really tall ceiling (hence the name Elevator Shaft) but there is no natural light that reaches it at all. Outside of it is a short hallway of sorts giving the Powder Room a small amount of privacy from the Living Room. This makes it not only next to impossible to get back far enough to photograph, it also keep this room very dark and makes the ceiling light necessary at all times which of course alters paint colors etc.

At one point I had given it a mini-makeover, installing some clearance stone backsplash tile and painting the builder grade honey oak vanity but that’s all I had done to it.

Now it was time to get serious and the first thing I had to address was the lack of light and how every picture made the room appear a sickly yellow hue.
The Transformation
I started at the top! Even though the ceiling was already just a soft creamy tone, I gave it a couple coats of my favorite white – Sherwin Williams “Alabaster”.

Next I started the walls. After removing the backsplash tiles, I put a wooden band in place all around the room even with the top of the vanity. I used MDF for this which I cut to the sizes I wanted.


Next I used drywall plaster to create a rough plaster on the upper part of the walls, covering over the previous orange peel texture that was on the walls and not making it completely smooth but not nearly as textured as the other walls in my main floor.

I installed another MDF band along the bottom of the wall as the base piece and in this lower area I used the same drywall plaster and this time plastered the walls completely smooth. This took several coats and a couple very light sandings.

Then came the fun part because….well…..power tools mostly. That and it showed progress much more quickly than the previous steps. Framing up the board and batten was simple. I made 18″ wide panels to suit the overall size of my space.
Once all the wood pieces were in place and all the nail holes were filled and cracks caulked, I gave everything a coat of primer all the way up to the ceiling to prime all that drywall plaster and all the MDF wood.
In order to stay away from anything with yellow undertones, I chose a very soft blush pink for the upper walls from Benjamin Moore called “Blanched Coral”. All the board and batten and door trim got coated in Sherwin Williams “Alabaster”.

See how much less yellow there is already? It’s amazing what a difference it made when I painted the ceiling white.
I also changed out the shades on the light that was already in here from a light amber glass to a clear glass shade. That also helped!
You’d think I was all done now except for the fun stuff like mirrors and towels and things, right?
WRONG!
One of the worst things in this whole room was the floor.
It was very plain and simple linoleum that I think at one point had maybe been pretty much white but over the years had become a nondescript yellowish something…..All I know is no matter how much I scrubbed it and no matter what I scrubbed it with, it never looked like I ever cleaned my floor.
In a perfect world I would put lovely new tile in here. But it’s not a perfect world and I am on a super tight budget and its such a teeny space…..and I wouldn’t be me if I wasn’t trying something different, right?

So I scrubbed it really, really well and grabbed some chalk paint an a little roller and set to work.

This is after 2 coats.

After 3 coats of the base white chalk paint, so that none of the underlying pattern or color showed thru anymore, I was ready to rock and roll with my stencil.
I used a beautiful stencil from Cutting Edge Stencils (the pattern is called “Casa Verde”) and Waverly chalk paint in the color “Mineral”.
It’s not hard, just time consuming waiting for it to dry so you can do the next one in such a tiny space. A larger area would go much more quickly, odd as that sounds.

Quite some time later…..

The next day….

A few swear words later….particularly around the base of the toilet…..

And here is the completed floor, with 3 coats of a matte floor sealer and the threshold in place. I’m so happy with how it turned out and I’m constantly getting compliments on it.
I can’t fix how hard it is to get into any sort of decent position or angle to take a picture of this tiny room but at least I can make it pretty!

The ugly floor that used to be one of the worst things about this room is now one of it’s best features.

I knew I wanted a jaw dropping mirror for this Powder Room and wasn’t disappointed when I found this vintage beauty! It is the perfect thing for this space.
I still plan to replace the faucet with a brass one and am currently looking for a vintage chandelier that is perfect for this space.
In the meantime I simply used some pewter Rub ‘N’ Buff on the existing light fixture and replaced the shades with clear glass ones so it basically disappears and doesn’t take away any of the attention that the mirror deserves.

Sometimes when you are looking for something very specific and especially if you have a weakness for truly vintage or antique pieces, it can take a while to find certain items for a renovation but it will be worth the wait when I finally do find them. I promise!

I couldn’t be more proud of how this tiny space turned out. It might still resemble the shape and size of an Elevator Shaft but I can’t tell you the last time I was in an Elevator that was this glamorous!
Now let’s skip on over to Emily’s and see how her Powder Room turned out!

Thanks so much for stopping by! I love to read your sweet comments. Y’all make blogging so much fun.
You can follow me on Pinterest and Instagram for even more ideas and great product deals. Follow my blog with Bloglovin


Tara I love it and such a difference the paint made. The floor looks fantastic too. Getting around the toilet looks like a few curse words were going to happen.
Love the mirror and you’ll find the right chandelier on your hunt.
Cindy
Thanks so much, Cindy! Doesn’t the floor make such a difference? Now I’m considering painting and stenciling all my linoleum in various other spots in my house but I’m thinking it over really well first because of aforementioned toilet! lol Yes, I can’t wait to share whatever chandelier I find for in there and the faucet once I get that installed as well. Thanks for stopping by!
Tara, this is night and day different!! I LOVE everything you have done in here! And, that mirror, AMAZING!!! Simply beautiful!!
It’s always so much fun blogging with you!
~Emily
I must confess, I am still madly in love with that mirror every time I catch sight of it! It has really set the tone for the whole room and is a tough act to follow when it comes to finding just the right chandelier and faucet. At least I’ve found the faucet…..hoping to find the right vintage chandelier one of these days…..loved blogging with you again. It’s been too long!
Tara,
Nicely done! The floor stencil is amazing. Regarding photos looking yellow under artificial lighting… I discovered that the new ‘white’ light bulbs improved the color of my photos, making them brighter and not so yellow. I try to take all photos with natural light, but sometimes (like your powder room) you have to use artificial lights.
Judith
I completely agree, Judith, about the white lightbulbs helping quite a bit and I do have those in this Powder Room. It does help but even those didn’t work before the makeover! Isn’t natural light just so much superior? You can’t substitute it, can you? I’m loving the floors too and so glad I finally gave it a try.
Great makeover, the stencilling looks perfect.
Thanks so much! I’m so glad I finally gave it a try after thinking about it for a while….
Just stopped by from lecultivator. I really like the paint color that you picked for this room. Such a great transformation.
Thanks so much for stopping by! Always a pleasure to welcome any of Emily’s friends. I’m honored that you like the makeover on my tiny powder room. It’s come a long way!
It turned out so well! We have some updating to do in our home and these are some great tips!
Well that’s great! I’m so glad you got some good ideas for your updates.
What a wonderful space! I love the idea of the painted floor! It looks just like tile!
Happy day friend!
karianne
Thank you so much! I am liking it so much every time I walk past or go in there and have gotten so many compliments on it that I fully intend to do more of the vinyl floors in the house in the same way! Thanks for stopping by.
[…] Checking Off My Checklist – Stilettos and Shiplap […]
[…] be me. Still, I knew I could probably scrape up something from the bits I had left over from my Powder Room makeover. You see, I put board and batten in there and I knew I had some leftover mdf pieces laying around […]