
So Emily from LeCultivateur and I were chatting last night. I know! Last night! She said wouldn’t it be so fun to do a special blog post showing 5 DIY’s for Christmas.
I said yes! O what fun it is to…..oops wrong song.
Then I was putting the kids to bed and the bright idea came to me that I should do a theme to my DIY’s. It’s not hard enough to come up with 5 Christmas DIY’s in about 12 hours. Let’s make it tricky.
So I did.
Did you know I have a thing for books? I’ve been reading about since I could talk and I adore books.
I have my grandfather to thank for that. I don’t recall seeing him sitting down without a book in his hands. He would read to me by the hour too.
Oh sorry! You wanted to see the DIY’s? Okay…..
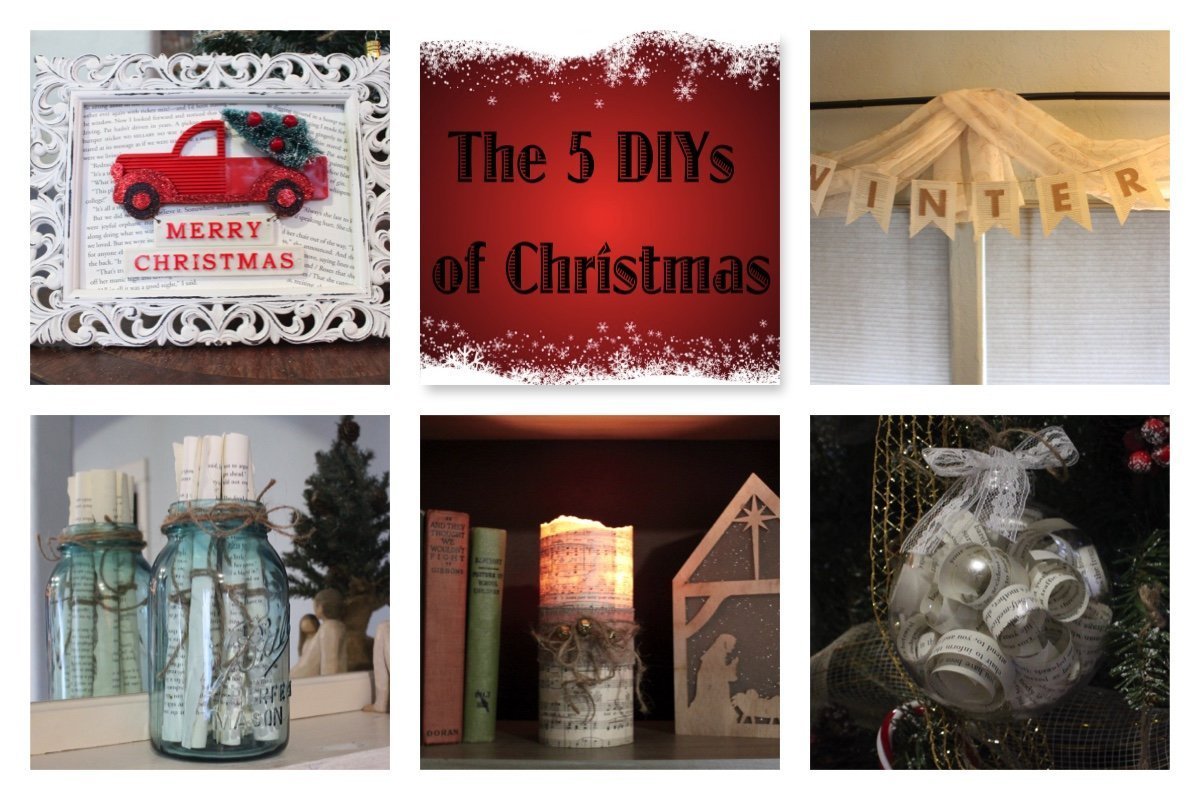
So I decided to try to do 5 DIY’s for winter/christmas, all using book pages.

First I grabbed this framed little mirror.

I took the frame and mirror apart.

Next I took 2 book pages and angled them to overlap each other and marked the outline of the piece of mirror with a pencil. Once I had cut the pages along the lines, I took some tape and taped the paper to the piece of mirror.

Then I taped the other piece on as well. You can see that I barely let the tape go along the very edge of the paper where it will be covered by the frame later on and most of the tape is on the back of the mirror piece.

I had seen this little tree ornament at Dollar Tree and immediately knew what I wanted to do with it!

I removed the tree from the truck and set it aside.

Using hot glue, I glued the truck and its little sign to my book page backing. Then I glued the little tree into the back of the truck again.

I took the black frame and gave it two coats of Rustoleum spray paint in a Satin finish Heirloom White. Then I took some 220 grit sandpaper and lightly distressed it once the paint was dry.

Here it is with the frame on the picture. Isn’t it cute? I’m loving it!

I’m definitely going to be making more like this soon. What a great gift this would be too!
On the 2nd day of Christmas my true love gave to me…..ooops wrong song again!

For the 2nd DIY I took some book pages…

…and rolled them along the long edge. I made sure the edge that was torn from the book was going to show, therefore I started rolling from the opposite, factory edge.

I tied the little rolled pages with a piece of twine and stuck them in one of my blue vintage glass jars. I embellished the top of the jar by wrapping some twine around it a few times and tying a bow.

I left mine sticking out above the top of my jar but you could easily cut them to fit down inside or use a taller canning jar if you don’t want them sticking out.

Voila!
Onward!

For the next DIY you will need to choose a word or a couple of words for the banner we are about to make. Anything will do. Perhaps “Noel” or “O Holy Night”, or what about “Believe”? I chose the word “Winter” because I want to leave this up all winter long so I didn’t want something Christmas specific. You will need 1 page per letter and 2 extra pages for either end. Also, if you have multiple words, allow 1 extra page for each space.
I made a template out of a piece of card stock and traced with a pencil on each page.

Then I cut them out.

Next I took each page and folded the top down about 1″.

I printed a simple tree pattern and used it to cut 2 trees from some scrapbook paper for either end of the banner.

I used stick glue to stick the trees to 2 of the book pages.
One the other pages I used burlap letters that I purchased from Walmart to spell out my word. These letters came with adhesive already on them. You could make your letters out of colored paper or more scrapbook paper too, or you could write them on each book page with a marker.

Then I took some twine and ran it along under the flap I had created earlier on the book pages, taping them down. You could also use glue if you wish but I didn’t want glue to make the pages wrinkle so I chose to use tape. It was quick and easy too!
I tied a loop in each end of the twine to assist with hanging the banner and left several inches between each page along the twine. The pages can be moved along the twine as desired to display.

This is what I ended up with! I chose to hang it over my dining room window.


For DIY #4 you will need some book pages, a ruler, a pencil and some scissors. Take the ruler and pencil and mark off lines about every 1/2″ along the short side of the paper. Cut the pages into strips along the lines.

Easy peasy, right?

Take a pencil and roll the strips, one at a time, around the pencil tightly. Slide them off the pencil….

Next grab a fairly large CLEAR glass or plastic ornament an remove the top.

“Fill ‘er up with regular” (or paper strips) and replace the top.

I added some lace and twine in a bow to the top of the ornament to jazz it up a little.

And there you have DIY #4!
Last one! Can you believe it? 5 of them, all using book pages? This was so much fun!
Okay ready? Set?
GO!

For this one I used music pages. Along the TOP of the music I tore the paper so it had a torn, rough edge.

Next I took a clear glass cylinder vase and measured so the the top torn edge was just above the glass vase a little. I cut the bottom to the correct length.
Using some Mod Podge and a small paintbrush, I covered the vase in the glue and then carefully rolled it onto the music pages keeping the bottom of the cylinder flush with the cut edge of the music. The pages will overlap. Just use some more Mod Podge and glue it all down. I did not put Mod Podge over the outside of the paper. Just underneath it and along the edges to make sure they were sealed.

Finally I embellished it with some burlap ribbon and some twine and jingle bells. I put a candle inside the cylinder. The best thing for this purpose would be one of those battery operated pillar candles with the realistic flickering. Then you would not have to worry about the paper ever, no matter how long you wanted the candle on.

And there you have DIY #5!
I hope you have enjoyed these quick and easy Christmas or winter DIY’s all using book pages. Any one of them would make a fabulous gift or certainly look wonderful around your own home.
Please feel free to pin this or any other image:

Now for an added treat let’s hop on over to Emily’s and see what she came up with!


Tara, I’m so impressed with your DIYs!! You created such amazing projects in such little time! I love them all so much!!
~Emily
Thanks, sweetie! It was SO much fun! Can’t wait to do it again!
This is just amazing! Every single one of your projects is so cute and I would totally do! Bravo my friend!
I’m flattered! That’s my goal! Glad you enjoyed them.
Some really great DIY decor. Love your easy to follow tutorials of your book pages. Love each and every one of them.
some truly quality posts on this website , bookmarked.
Thank you very much!